SHOPPING GUIDE:
HOME DEPOT – all tools and all building material, bagster bags, bamboo flooring and underlayment, MDF for all molding, including window and door casings and trims, curtain rod and rings, paint as follows:
Feature wall – BEHR ultra, paint & primer, base 1753, S-H-150 Chianti, flat for walls, semi-gloss for baseboard
Other walls – BEHR, base 3050, 1823 Antique White, flat for walls, semi-gloss for baseboard
Ceiling – BEHR Premium Plus, ultra pure white 558, interior ceiling flat
Door and trim – CIL smart, built-in primer, trim & door, white, semi-gloss
BAGSTER – debris pick up
IKEA – PAX wardrobe system, bed frame with the spring box and mattress, wing back chair, ceiling light, floor lamp, closet lights, bedding and some trow pillows, carpet, faux sheep skin, footstool (refurbished), glass side table, brackets holding the nightstands
FABRICLAND – draper fabric, lining and other supplies
DESIGNER FABRICS – upholstery fabric for footstool makeover
HOUSE OF ANTIQUE HARDWARE – decorative nails for footstool
HOMESENSE – vase, some trow pillows, trow
NU-FLAME – fireplace
CIOT – mosaic white carrera marble tiles
URBAN TREE SALVAGE – reclaimed wood for the mantel and nightstands
LAMPS PLUS – wall sconces
I used these two websites to find licensed contractors: Trusted Pros and Home Stars . Try Home Advisors for the United States.
MENTIONED TOOLS:
Power tools:
circular saw, jig saw, sliding compound miter saw, battery powered screw driver, automatic screw gun (not shown here but used for drywall and subfloor), tile cutter, nail gun with the air compressor, electric detail sander, sewing machine.
Other useful smaller tools:
hammers and sledge hammers, garbage buckets, shovels, measuring tape, stud finder, construction ruler, simple level tool, caulking gun, sanding sponges, hand saw, masking/painters tape, brushes for painting, lint free paint rollers, paint roller handle and pole, paint tray, cement spreader, paper or plastic covers to protect areas if needed, sharpened pencils, lots of paper, computer to help you design and plan better (but not mandatory).
Basic MANDATORY equipment: working gloves, protective eye wear, mask.
IMPORTANT NOTES RELATED TO THIS VIDEO:
1. You`ve seen and heard the kinds of work I did to make this new master bedroom happen, but I want you to have in mind that I did have help, especially when comes to carrying and handling large items e.g. drywall, or setting up and installing the moldings. Also, I had help with certain power tools (not that it is a rocket science – it is not, infact it is the easiest of all, but you need to be comfortable doing it). For quite some time, this was also my full time job. I wanted to give you heads up about what`s in stake, so that you can manage your expectations better when planning on doing something like this; organize the help that you might need and set the realistic time frame in which you can complete it. Otherwise, it can be really frustrating. And, I strongly recommend hiring a licensed professional for any structural job.
2. Be aware that many of costs listed here (expressed in CAD) are estimates only, rather conservative ones, and were applicable at the time of the renovation. Prices on market continuously change and significantly vary depending on where the project is located, I`m not only talking countries, but cities too. So, do your research ahead of time and compare, see what saves your money the best.
3. I am stressing on this one again; please be safe. I am not a professional designer nor builder, this is simply my working experience that I am sharing, so I will not be responsible if you end up injuring yourself trying to do some of the projects described here. Like I did, please inform yourself well from trusted professional sources before embarking onto anything similar. I don`t wanna scare you, simply be smart and safe. And have fun!
4. I had no sponsors whatsoever for executing this project, however, should that change down the road, which would be great because that would mean making more of the helpful videos, I will let you know. I will do that because I want you to know, and because it is a legal requirement. Brands and material mentioned in this video are my true choices as a customer, and weather I eventually get sponsorship for something or not, this part will not change. I will not recommend nor praise something that I personally wouldn`t use.
5. If for whatever reason you would like to read the full script of this video episode, scroll below, you will find everything there, grammar mistakes included!
6. To read more about me, other design and DIY ideas, about my fashion jewellery line and many other interesting topics, please browse through this blog and sign up with your email.
7. And yes, the necklace featured in this video is one of my unique designs. You can check what is available at my online jewellery store at www.sgravalli.etsy.com
8. The entire production of this video is attributed to another passion of mine and it has been executed entirely by me (again, not a professional movie maker). Music and fonts in this video are either royalty free or with purchased license, while all the video footage, photos and all presented designs are mine.
9. Ms Raccoon and the family were truly my next door neighbors, I`ve been meeting with them every night for some time… Too cute.
Full transcript of this episode
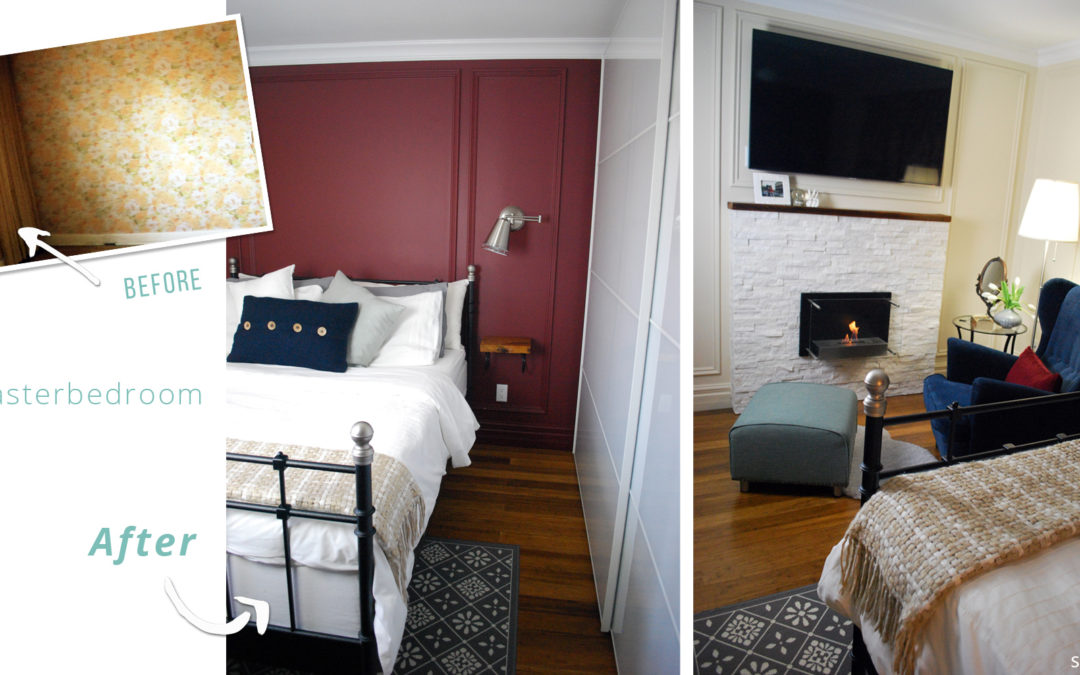
Hi! I`m Olja and I`ll show you how to completely gut an old master bedroom and transform it to a brand new retreat getting the most out of the same space. I`ll share the tips on how to achieve magazine worthy look, and, SAVE MONEY by doing it yourself, even with no previous design nor building experience.
Welcome and thank you so much for taking your time to watch this video – I hope it will inspire you and arm you with some really good tips.
Few words about me… After many years of working, first as a graphic designer and later on as a product marketing manager in financial services, I was laid off when the global economy crisis struck, JUST 15 days after I purchased my first house, a fixer-upper from the -60-ies, with my partner at that time. Struggling to land on a new job in marketing, savings had to be made, so I`ve learnt how to design spaces and how to actually build them – which is something I have never done in my life before. I knew I had a passion for fashion and cooking, but building material and tools?! A whole new world opened up to me just like that!
So if you have a space that needs renovation, decoration, but professionally designed space is not in your budget, I`ll show you how you can do it yourself for the benefit of creating your own custom look, while saving money, having fun learning something new, and at the end, being darn proud of your accomplishments, earning the right of calling yourself a super-master-genius.
Onto the master bedroom project now.
The decision was to demolish all plaster walls inside of the house – ALL- so that the walls could be re-framed properly. That allowed for a new layer of insulation to be installed as there was none, and of course to run the new electrical. So if you are doing this huge job already, you may as well have your design plans in the works right there and then, because then, for example, it`s so much easier to plan to have the light fixture where ever you want, or hide the cable mess inside the walls. Also it is most definitely easier to deal with the new drywall rather than with the insane square footage covered with the old wallpaper which seems to have infected every single corner of this house!!!
Now; before we move on, I do have to make a note about safety. Before you decide to go ahead and do any of these jobs yourself, I encourage you to inform yourself really well from trusted professional sources, and then you will see what you can truly tackle alone by taking certain safety measures, and what you may have to leave to the professionals. As I mentioned I am not a professional, this is simply my experience that I am sharing and a thing or two I`ve learnt during this elaborate 4-year hands-on process. And; having something cold from the freezer to press on for when you bang yourself (cuz it WILL happen), it`s always great idea..
So, I armed myself with some basic tools, and not to forget just several sizes of sledgehammers of course, protective clothes, a construction mask and eye wear (in my case double) as mandatory items. Demolition can start! Also what I found is that it`s so much easier when you think of the wall as something that made you angry or dissapointed, like for example, when you were laid off from the job you absolutely loved and was freaking good at it! I mean you can imagine anyone on that wall!!! Just pump up your muscles and BANG! start smashing!
We removed old floors as well, as they were just so thin and squeaky, they simply had to be redone. Fixed down with gazillion little nails which I had to remove passionately one by one. (Yeah..I think I must record a whole new segment on “fashion” under construction..)
Done with the old, cleared the space for the new – such liberating thing!
With the clean canvas now, it`s time to make some plans of the new space following these 4 steps:
1-THE USE OF THE SPACE
First and foremost, you need to think how this space will be used, besides sleeping obviously. Functionality first. Is it going to be your dressing room – are you going to be having closet space inside of the room and how much of that space would you need. In this case I had to deal with the built in closet, already too small and with its access limited by the height of its door. I`ve decided just to put it all down, and take one entire wall to install floor-to-ceiling closet from IKEA, that can serve two people and definitely make you not miss the walk-in closet.
Then, ask yourself what else will you be doing in there; will you be reading books, will you be watching tv, will you be using it for the office work maybe… For being pretty casual people, the decision was to most definitely have the big TV installed in the room that can be watched from the bed. Also, I very much enjoy reading books, when I have time, so I tried to squeeze in a separate area for such “activity”.
2-MOOD OF THE SPACE
Now you can move on to deciding what kind of a feeling you want to create; maybe you remember some nice hotel you`ve stayed at, some other relaxing, cozy spaces you`ve visited – and let me tell you – you can always find lots of inspirational images online as well. For me, I knew I wanted a cozy atmosphere, where the old world meets the new, where the decor and feel will preserve the house built in the 60-ies, but it will surely mark the modern times as well. Key four things I wanted; a fireplace, different lighting, elaborate wall moldings and rich, custom made, french pleat drapery! And this is the moment where you can totally blow up your entire budget, but if you are willing to roll up your sleeves, I can show you that you can have all the lux items you wish if you are willing to do it yourself.
And this is not something you have to do, but I like to motivate myself, so I used my graphic designer skills and I created the room I wanted in Photoshop. Color-scheme included! (if you are embarking to such journey with somebody, keep in mind not everyone can visualize things without actually seeing it, so this type of exercise surely helps when making joint decisions).
3-MEASURING, TESTING, DRAWING
And then by this point you should know if there are any furnishings you are bringing back to the new room. It is also the perfect opportunity to declutter, and maybe repurpose some of the furniture elsewhere in the house. I knew I was bringing queen size bed frame from my previous apartment, so I`ve included it into my designs.
The measuring tape and painter’s tape are your best friends now. Measure the space (if you are doing what I did here , then, don`t forget that the new wall framing will eat your space once the 2by4’s are installed on each wall, plus the thickness of the drywall, and plus any baseboard you may be installing – I sure hope you will be). Measure the existing and any new furniture/closets, even those you may not get right away but later on – I sure do recommend you to make your full plans right at the beginning, it doesn`t matter if you can only complete the room in a year let`s say, but you have to have the plan that you will stick to. With the painter’s tape, make all the markings on the floor, that way you will see right away, what can fit, what feels good, can you move around, and what needs to be changed. Put all that on paper. Obviously I used here software, but pencil and paper will do just fine.
4-CHOOSING THE COLOR SCHEME
And now you just have to decide on your color scheme and you can go and create. I think safest way to go for anyone really, is to pick a fabric, it can be for a throw pillow, a rug or a drapery, with more than one color in it, and there they are! You saw in my mock-ups earlier, I wanted grey-yellow-white color scheme, pulled from a drapery fabric I wanted, but meter of it was priced at $30 CAD, which was too much for my budget, so I found this fabric on clearance for $5 CAD. For French-pleat drapery in my room, that is total saving of $350.
From this piece of fabric, I pulled the antique white color and the maroon color for the walls of the room, then gray and navy blue for most prominent pieces of furniture and decor in the room. This way, everything comes together and relates to each other in harmony. You can`t go wrong with this formula – just stick to the fabric as a starting point and always take fabric with you when shopping for the rest.
Once you are done with these 4 steps, it`s execution time!
There are lots of things you can do yourself and save lots of money, but I would strongly encourage you to leave the structural job like framing the walls, or removing existing ones because some of them might be load bearing walls, which means, a supporting beam or a post will need to be installed. For that you need a licensed professional. Also, electrical job, please don`t touch that, unless you have real good experience and know how to do it by the code. But even if you need to upgrade your electrical panel in the house for example, as it was done here, you have to have a licensed contractor to do that for you. For the electrician to do the job, you need to have those plans ready, making sure you point on where you want which light to be, like for example wall sconces or lights inside of the closet, should it have let`s say a separate switch and where. Based on your planned furnishings, where the cable TV should be positioned, imagine all wall electrical outlets that you will need – you really need to think what you will be plugging in and where would be the best spot for it. So this is if you are building new walls, or re-framing existing ones like here. But if you are not knocking down any walls, you can still install let`s say new light fixtures in a brand new position, the electrician will make some smaller holes in the walls, through which it is possible to fish the existing electrical wire and create the connection to where you need it. After that, patching of the holes is required with a little tape, mud and sanding. Done this option as well in a previous apartment, so I can tell you, everything IS possible.
From this point on, I believe anyone can build the rest, because I did it!
After the electrical job, wall insulation is next. There are different insulations out there which are also differently installed. I used here Roxul stone wool insulation, product made of natural and recycled materials. I used two types; this pink one is for the exterior wall which I further covered with thick plastic, and taped its all edges, all openings around the electrical outlets with the permanent tape so there is no air flow. And for the interior walls, like walls separating the rooms, I used this green one, which is also fire resistant but what I like the most is that it absorbs the sound. Covering this one with drywall is enough. And this is so easy to install, because they come pre-cut in pieces that exactly fit the standard distance between 2by4s of 16in, so minimal cuts are needed (which are also easy to do with a simple knife). And whatever smaller pieces you may be left with after cutting, you will for sure use them to patch up some holes usually around the window box. Cover your skin fully when dealing with this, because it can be itchy on your skin. Always wear mask. This product has many nice features, but the most important one I think is that it is certainly an awesome energy saving item worth your investment.
Next step brings drywall into the play, and four hands can totally do it, with simplest, littlest tools. Some standard drywall comes as 4feetby 8feet in 1/2 inch thickness, you can opt to go for something thicker than that to improve room-to-room sound control, which was done here. You have many information out there on how to install sheetrock (or drywall) so I`ll just move on to the next task.
And now it comes to the job part I hated the most, but it was only step away from me to start bringing in the pretty into the room, so that vision got me motivated to push thorough the worse. I am talking about taping, mudding and sanding! Yeah sanding the worst of all construction jobs I`ve done – absolutely! The good news is, when you start doing it room by room, you become better and better, faster and more efficient. And if you go to the gym, that will help you greatly, because this is labour intensive activity. You gotta be strong – physically and mentally. And even if you are working with the existing walls, you still need to patch up any holes and imperfections that you can see, before painting it.
This work can be really exhausting and make sure you take a break when you need it; go out, make friends with your neighbours… especially if they are so cute and fury ones!
Almost simultaneously as the walls were being built, the floor were getting its improvements as well. After old boards have been re-screwed and no more squeaking could be heard, there comes the new subfloor. Again, all you need are four hands, but this time some more serious power tools, and if you don`t have them, you can rent them at the Home Depot for example. You will need a Circular saw, and to cut wierd little corners or vent openings, you will need something like a Jig saw. Each board clued down with the construction glue, than screwed. Now that`s a sturdy floor!
Walls ready, floors ready – It`s time for pretty things now.. Exciting moments!
If you are not going for any wall moldings, you can start priming and painting walls from this point on. However, I really, really wanted wall molding, lots of it, with the elaborate crown molding and the even bolder baseboard. This adds so much character to the space, it makes it look high- end and gives it very cozy feel. When we renovate our homes we think of bringing the value of the home up, so one thing you should know about this; it really depends on your neighborhood, but you shouldn`t stand out too much when reviewing resale options down the road in terms of home finishings, so for some- this may NOT bring back the investment. However, if you learn to do it yourself, you are covered! For this room in particular, I saved approximately xx$ by doing it myself. To do this properly and nicely, you need to arm yourself with patience. And remember we learn the best when we start doing things, and making mistakes, so cut yourself some slack at the beginning and don`t give up.
(I am planning on making a separate video with the step-by-step guide on how to install various wall moldings, so please subscribe to my Youtube channel or visit my website at www.sgravalli.com and subscribe there and never miss the new content coming out. Later on, additional info and links will be added just right down below this video. )
For now, I would like to just point on a few, key tips;
TIP#1 – BUILD SUPPORTED BACKING
to install crown molding, you should definitely first cut some triangles using a piece of 2by4, then glue and nail those first to each 2by4 behind the wall which you will locate with the stud finder. Now you can place the crown molding which should align perfectly on those triangles where you need to fire the nails in. Sturdy as a rock!
TIP#2 – COPE THE INSIDE CORNERS
Second tip, on the inside corners, either crown molding or a baseboard, do not just cut both sides to 45 degrees and join them together, because walls are not straight, boards are not straight, chances are you will not have a nice joint, and more so, over time, boards and binding material will contract and expand in different temperature and humidity, and this gap will become much much bigger. Instead, put in some more work now, and make better joint by COPING one of the ends in the joint. This basically means, that one side should be sort of eaten behind, so when you join it to the other board it will sort of slide over that other board into much better fit, that will have minimal changes down the road if any.
TIP#3 – DRAW AND MEASURE WELL PLANS FOR WALL MOLDINGS
The third tip I would like to give you is regarding those squares on the walls. Have your measurements of the walls in hand, room plans as well, and based on that, decide where these squares should be, in which size, the same or not the same, aiming to match a particular feature of the room, for example I was aiming to fit a bed frame into one larger square on one wall, then I aimed to sort of frame the tv on the other wall and make it proportional to the fireplace. Do you see now, how important is to have all those room plans ready in advance, to the details? Then, draw it down, mark all exact measurements, then draw it on the wall. When drawing it on the wall, choose to start from the ceiling, where it will be more visible than the bottom, therefore, should look perfect up there. There is a tool I attempted to use at the very beginning, like a little mouse, which you can fix to the wall on one side of the room and turn the laser on it, and it will simulate the straight leveled line across the wall to the other side. All that would be great if only the walls, so close to the ceiling joint would be straight. So that did not work. Instead, I dropped down the same measure from the ceiling or crown molding to the top of each square, so that space across the wall actually looks even. This was my starting point when transferring drawing to the wall as real measurements. I built each square from four separate, pretty flexible boards directly onto the wall, all measured and cut as per drawings on the walls, glued down, nailed down, and all gaps, all joints, all nail holes filled with caulking.
For this project I used MDF product, which is engineered wood product and it means Medium-density fiberboard, it is more affordable than the wood product, it is easy to work with, and it also comes as primed. I used MDF for all moldings including new frames and trims for the door and the window. To cut ends and corners, it is great if you have or can rent a Sliding Compound Miter saw, but not necessary, with little more time and extra muscle power, you can do all the cuts with the hand saw and a little plastic holder invented for this purpose that has slits of different angles on it. Some tool for precise sanding will do handy when doing coping, and you`ll need construction glue, nail gun, caulking gun and lots of caulking to install it all.
After I did two rounds of caulking, made sure everything is smooth, it was time to paint.
To keep the character and not drama, I wanted my wall moldings to blend in rather then to stand out, so what I did here was, I painted all the squares, and the baseboard later on, the same color as the background wall with the exception of choosing higher shine level for the baseboard paint – this is to stand out a little bit and to be more durable to any scuffs. Decided to let the crown molding be the crown, so I painted it in white all around, same as the door and window trims.
For the floors..ah floors were a true treat. They have such amazing products out there now, like this strand-woven bamboo flooring; insanely hard – commercial grade. Comes in two natural colors, pale one and this one which is reached by the way they process it and not stain it. It is eco-friendly – it takes only few years to grow the plant and once it`s harvested the root still continues to live. So easy to install, it is a floating floor, and planks are joint by a simple click system, and you can so totally do it yourself. Make sure you get the right underlayment for it and buy approximately 9% extra material than what your square footage measures, to allow for the waste and all the cuts. Heads up for having to do weird cuts, like for example the vent openings, you will need good power tools and patience, as this is freaking hard wood to cut – take your time, be safe. So if planning on investing in the new hardwood flooring, you may consider bamboo instead, besides all the advantages I just mentioned, you should know, strand-woven bamboo is harder than many hardwood floors, including red oak, and in many cases less expensive. It will last for a long time.
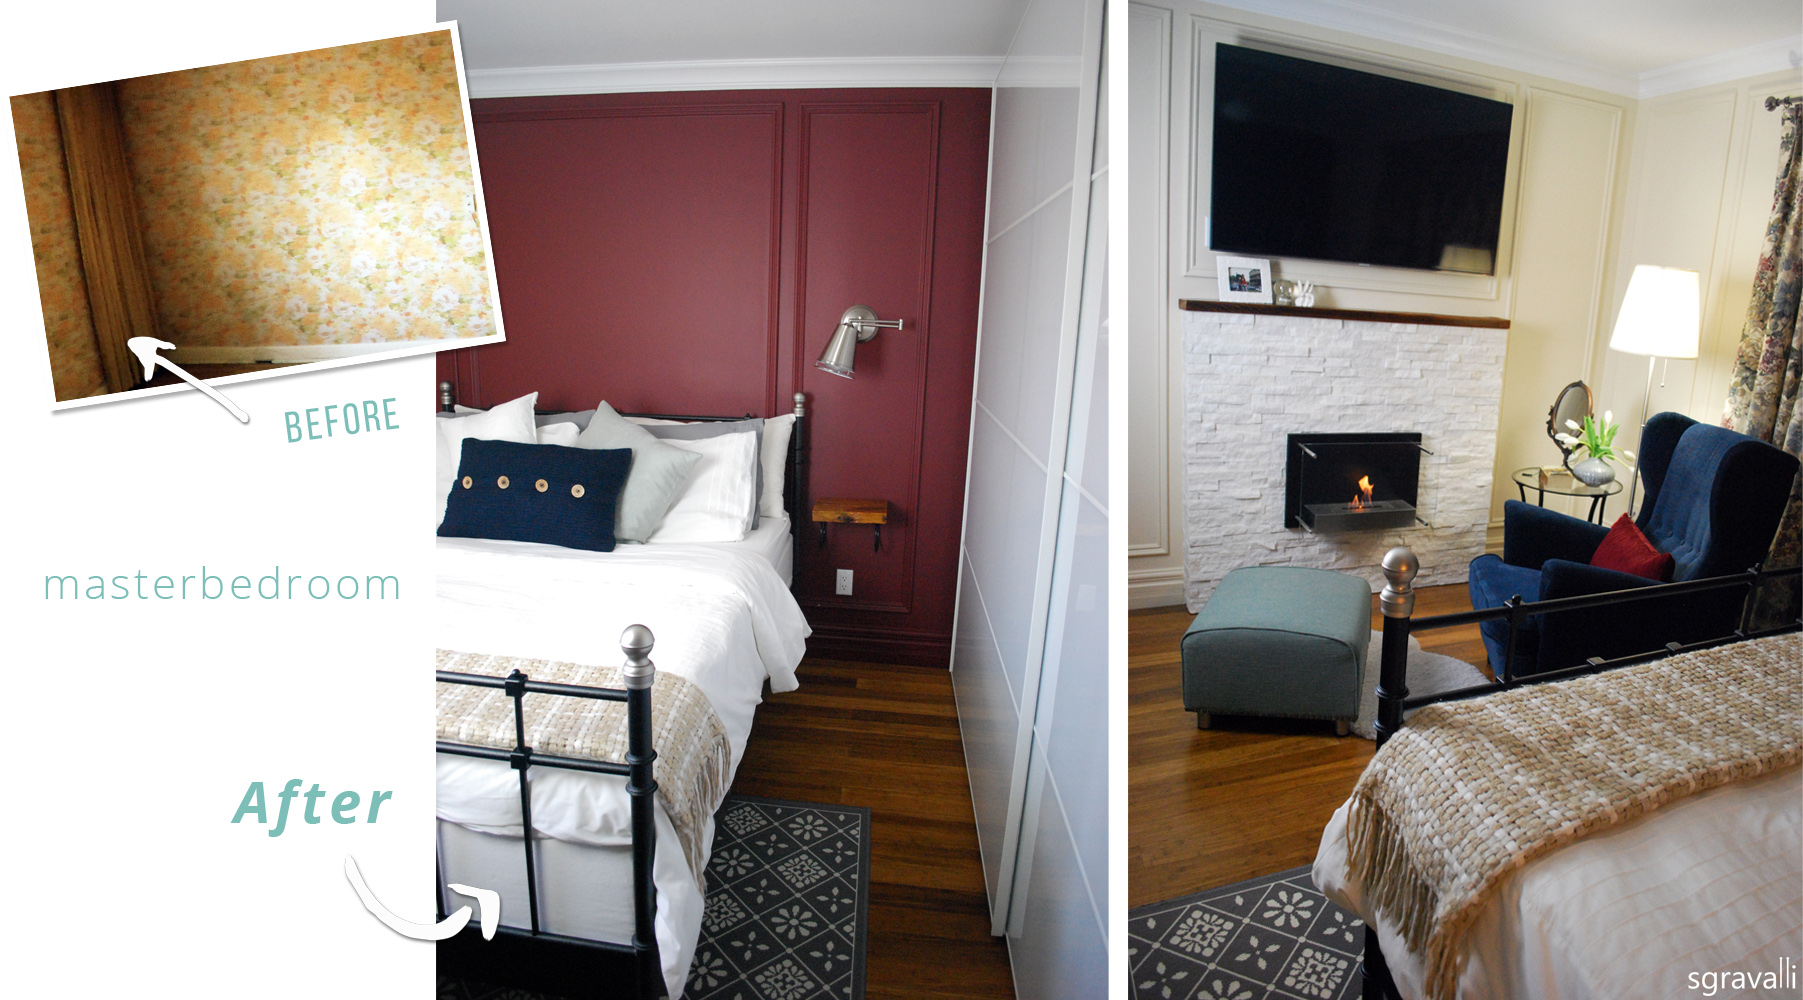
There is something about having a fireplace in the master bedroom… I just wanted it so bad. The problem was, to install the gas fireplace from scratch, you would have to run some installations through the walls, and drill holes, and connect to the outside, and then invest in a gas fireplace itself – those ain`t cheap – it all comes down to thousands of dollars! Without the mantel! Of course you could hook up an electric fireplace and just plug it in, and then scratch your head once you get the electricity bill. So how about this – wall mounted fixture – no background installation needed, you can put it almost anywhere, and run it on bio ethanol. It is eco-friendly fuel, completely composed of biological products, its emission is clean, therefore burning this fuel is effective and efficient. And you can get one of these for only couple hundreds of dollars! There – mind blowing!
You know what I did – I just asked the contractor who framed the walls, to install for me an additional simple square for the fireplace mantel according to my drawings. It took him few minutes to fasten just a few 2by4 scraps, and saved me a lot of money. Later on, after the sublfloor had been installed, I used that wood leftover to wrap the mantel skeleton, and with that made it ready to receive tiling. Also such backing allowed me to screw and fix on it anything I wanted later on, which is important for the wall mounted fireplace fixture.
At this point, I`m thinking stone! And honestly, for such small area, it would make sense to even splurge on, but because you don`t need a lot, you might just find enough leftovers of something gorgeous in the clearance section of the tile store. Yep – scored here too! (check if I can find the bill) And again, if you tile this yourself, you saved a ton!
Few tips when tiling with this rough stone mosaic tile; wear gloves – little sharp pieces can easily go under your skin. Take it slow, rest – these were heavy for me to hold in one hand while I splatter the cement on it with the other. Cut the edges straight and make joints in that manner, easier to do and it is neatly looking in the end. Measure all, line tiles on the floor first. When installing them, go as close to each one as possible leaving no intentional gaps. Whatever gaps are left, because it is a rough stone there are going to be some, and you cannot simply do the grouting, so you will take a plastic bag, just large zipper bag for food will do, cut small hole on one angle, push the cement in it and squeeze the cement through the bag into any gaps, much like cake making. Smooth out with the finger. And voila! For the top, I went and sourced a little piece of Toronto history, which is important to me, I love this city that I get to call home. I found reclaimed wood in a specialty store, saved from an old multi-unit residential building that was built in 1929 and it is beautiful Douglas Fir wood. Simply cut it to size, and then, I sanded it down real good and applied three coats of polyurethane, and I did just the same for the nightstands for this room. Used construction glue to fasten it on top of the mantel. Boom -Done! Fireplace fixture is now simply screwed onto this mantel. Looks like a million bucks, but in reality, it was built with scraps and muscle work.
By now, I swear by IKEA storage solutions, weather we are talking about the kitchen cabinets, or closets like this one, what you can imagine, you can pretty much custom build with their computer app, which anyone can use really. Sometimes some additional customization on your own might be required, or simply wanted. In this case, I really wanted to have continuous look of the crown molding on top of the closet, so it almost looks like built in the wall, and to run good lights inside of it. To do that, each vertical piece of that closet had to be shortened by about 1 inch before it was put together and installed. Electrical wires had to be run from the top and made sure they all went behind the railing on which sliding doors were moving. That additionally imposed major difficulties to install that one piece of crown molding, but, in a third try and third prepared crown plank, and veeery thin nerves, it was completed. In moments like this, somehow, you have to make yourself push through, breathe, or the best – leave it in the moment in stress and come back to it the next day – always better results when you are fresh. Once you see the results in the end, you`ll be proud of your struggles because you will see it was worth it.
I have to tell you one thing; I love fabric! I could never get enough of it. My favourite thing when creating a new space is fabric. French pleat drapery in particular, so when I moved into this house, a fixer upper, I envisioned such custom made drapery for every window. So I went on to have it priced, to see how much would it cost me just to have it made for the window in this room. The price WITHOUT THE FABRIC was $1400. I saw that not happening, and instead, I got a simple sewing machine for less than $200 and decided to learn how to sew. Let me tell you; by now, I`ve sewn miracles I think, and for this room, my first French pleat drapery.
I`ve recorded step by step as I was doing it, so do expect detailed tutorial in a separate video, I will announce it just below this one, o,r you can also find all my content on my website at sgravalli.com, or simply subscribe right here!
And now thinking on furnishing for the room, I would always see what I already have, that can be reused, perhaps changed a little, just like this red old footstool from IKEA. I really don`t need it in red for any room now, and I could use a piece like this for the seating area in this room, so I`ve decided I will reupholster it! Because the red fabric is just a slip on, fastened down below with the velcro tape, it was easy to remove it, rip it off where sewn together, iron it, and that way use it as a pattern to help cut the new fabric. It`s such little piece, so for that much fabric I went to designer store in the clearance section and got a scrap of premium upholstery for 9 bucks, had enough for this and still have leftovers for a few throw pillow cases! Used my trusty sewing machine, put all new pieces together, I even reused the velcro tape to save money, and slip on the new upholstery. I wanted a little glam, so I got a box of decorative nails, nailed it all along bottom edges of the footstool. Put legs back on – all new and glamorous!
That day, the day when you start putting furniture in, the day when you get to use the space for the first time, when you get to sleep in that room, it will feel like the best day of your life. To me, that rewarding feeling of accomplishment is incomparable to anything else. You think I rock man, I created this! I built this and it`s awesome! I get to really enjoy it now and I didn`t break the bank for it.
In the end, I managed to get out of the same, rather smaller sized master bedroom: two separate areas, huge closet space, a fireplace and all the lux and comfort pieces I wanted. I did fit in the queen size bed, with plenty of room to move around on each side. The look of it- because it is propelled up on tall legs, it gives an illusion of more space, revealing the free space underneath. But in order to make all that to work, I had to have everything else up in the air like the night stands, and the bedside lights. In addition to that, because closet runs along one side of the bed, I had no choice but to go for the sliding doors on it, and I had to be careful how to design inside of the closet in terms of any drawers that will be pulled out on a regular basis, so that also doesn`t interfere with the night stands or the bed. Remember, functionality first, so always, always pay some extra time to predict all these details, test if you can, and then work the pretty around the function.
I actually did get two visually separated areas in here, and such separations is easy to do with rugs for example. I choose geometrical patterned rug – to play off that flowery, rather traditional motif on a drapery, and placed it half way underneath the bed. This way you`ll still have something warm for your feet to land on when you get up from the bed, but the main purpose of it was to define the “bed space” and bring in some softness to the room of course.
The other area is marked as sitting corner for the reading or actually watching tv as this wing back chair turned out to be very comfortable for that as well. Place to sit, relax, put up the fit, cozy up by the fire, have a cup of tea.
Different lighting in the space makes so much of the atmosphere and I managed to get what I wanted, hands down the closet light my fave, it radiates such wonderful soft light through those glass doors.
I got soooo much space with the new closet and the functionality solutions for the inside that you can pick and choose at IKEA is just so great, keeping things organized, nicely displayed, you can reach to everything with no problems, so dressing up actually gets done much faster!
One thing I really enjoyed in this room, was to watch TV from the bed. From this spot, I can take the whole room in, all of its coziness, comfort, and each time, I`d think to myself, I built this, I am a super-master-genius!
Hey, thanks for watching, for more videos like this, please subscribe to my Youtube channel, and head over to my website www.sgravalli.com subscribe with your email there and never miss a new content. For all additional info related to this video, just scroll down, and find it under description.
And yes, please leave a comment. Do you have similar experience that you would like to share with us, please do; any useful tip you have under your sleeve, put it all down there in the comment box. Until the next time, bye.
Keep on writing, great job!