Hey guys,
I hope you enjoyed the video and that you will try this easy DIY tutorial to make your own tulle skirt. I`d love to see your proud creations, so if you have pictures of an elegant tulle skirt of your own, inspired by this video and sewn following these instructions, feel free to write me via Contact page on this website , maybe we can share your pictures too, if you`d like to!
Don`t forget to hit the subscribe button on my YouTube channel, definitely sign up with your email right here and follow me on social media.
Thanks!
Olja
Couple of other important notes related to this video:
1. I had no sponsors whatsoever for executing this project, however, should that change down the road, which would be great because that would mean making more of the helpful videos, I will let you know.
2. If for whatever reason you would like to read the full script for this video episode, just scroll down, you will find everything there, grammar mistakes included!
3. To read more about me, other design and DIY ideas, about my fashion jewellery line and many other interesting topics, browse my blog section and other pages on this website.
4. All statement necklaces shown in this video are my designs, you can check what is available at Sgravalli Fashion Jewellery online shop hosted by Etsy.
5. The entire production of this video is attributed to another passion of mine and it has been executed entirely by me (but no, I am not a professional movie maker). Music and fonts in this video are either royalty free or with purchased license, while all the video footage, photos and all presented designs are mine.
SHOPPING GUIDE:
FABRICLAND – fabric and other sewing supplies
WALMART – sewing machine
Full transcript of this video
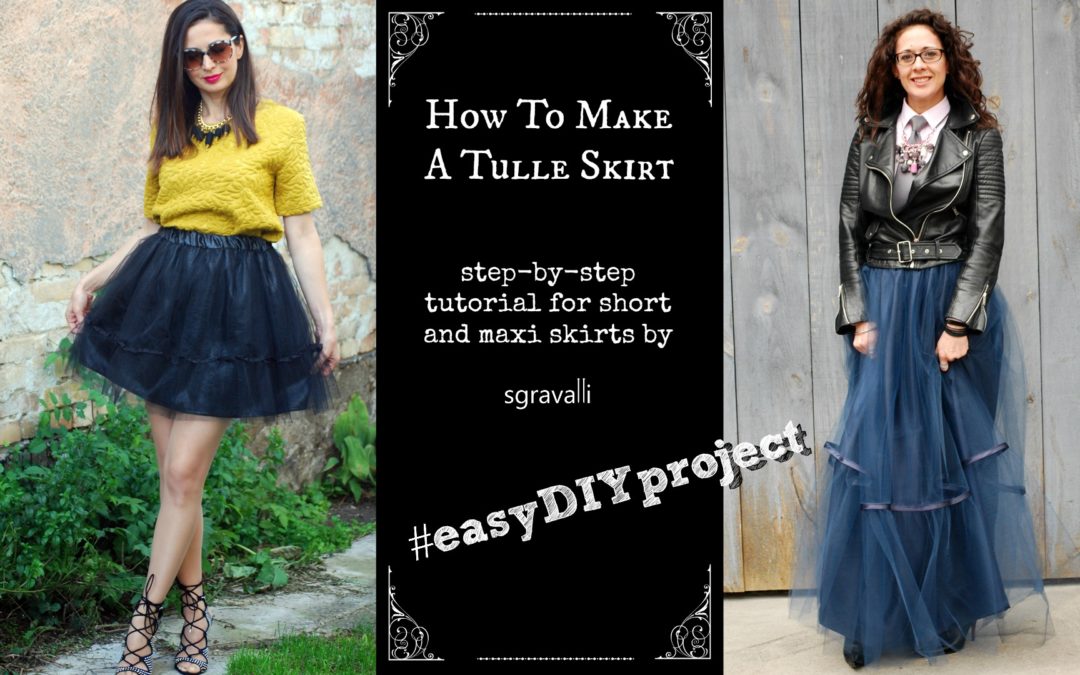
Hi there! I`m Olja and you are watching a tutorial; “The Make Of A Tulle Skirt.” I will show you how to tailor and sew this fabulous skirt, weather you are going for a shorter version or a full-length-to-the-floor-version. Either way, you will be surprised how EASY is to make it! Even if you are new to sewing, yes – you can absolutely make this, always fashionable, and just stunning skirt. So stick with me because I will also have an extra surprise for you at the end – some really cool styling ideas that will make your skirt suitable for many different occasions!
Welcome folks! And thanks so much for taking the time to watch this video – I would be really happy if you find it useful.
If you didn`t watch my YouTube channel before or haven`t been on my blog pages yet, then let me just quickly introduce myself… Well my blog and this YouTube channel, plus my other social media channels, are following my personal experiences involving some serious home renovations, DIY projects and designs that I develop myself. Then, I also design and make hand knitted, entirely hand crafted mix media jewellery, and you will see some of the pieces featured in the announced styling ideas for this skirt towards the end of the video.
And skills? Well, just about five years ago I knew nothing about all this, but then I bought my first house, a fixer-upper, and just fifteen days after that, I lost my marketing job in financial services… Why life why? Now I know why – for the better! Because I discovered my new passions and talent! I learnt to do all this; from furniture refurbishing and sewing to tiling and sanding the walls! I started doing this to save money for all the work that needed to be done on the house, but now it turned into pure love! Oh and BWT; I learnt how to sew when I desired to have custom made drapery for the windows in my house. Naturally I also started sewing garments which has something to do with my love for fashion and here we are! I love saving money by doing stuff myself and I really enjoy that rewarding feeling once I see my projects wonderfully completed – I like to think of myself then as of a SuperMasterGenius. So if you think we have something in common, you can subscribe right here or head over to my website and leave your email subscription there.
But right now, let`s talk about the tulle skirt. Here we go guys…
To make this skirt, we are going to need two types of fabric; the first one that will serve as an under layer, or the base, on top of which will come the second one, in several layers – the tulle fabric of course. We will also need elastic for the waist, the matching thread, and one extra thing – a piece of a bias tape for the top layer of the skirt. For this navy blue, maxi skirt, I bought about 2.5m of sateen fabric for the base layer, and 10m of tulle fabric (both come in 150 cm/60″ width). For the short black skirt I got about half of this, because with this width I got double the fabric. I bought 3m of bias tape.
However, the total amount of fabric and bias tape will depend of a few things; your measurements, the length of the skirt, the fullness and the number of layers you would like to have. Just keep on watching, and I will explain exactly what I measured and which decisions I took – it will help you when planning for your skirt.
Let`s take some measurements first. Measure your waist, then the hips – the waist casing that will hold the elastic needs to pass the hips, so definitely have this measured. Mark the comfortable measures, not super tight ones. And then finally, measure the length of the skirt that you would like to have. Write everything down. I can only function if I visualize everything for myself, so that`s what I`ll be doing along the way.
Now this is a little bit boring part but setting up the right dimensions is the key. Working with the numbers that you have; for the base (in my case here for the sateen fabric) take the measurement of the waist and multiply it by at least 2 or 3 times. I rounded mine to 200 cm, which is just under the 3 times. The more time you multiply it, the more fullness you will get, but my recommendation would be to get more fullness from layering the tulle fabric rather than bumping up the base. Multiplying it by 3 is a good number.
Next, decide about the tulle layers. Aim to have at least three layers if possible; both skirts here were made that way as well. I started the first tulle layer, in dimensions just a little bit more than what I had for the base, and then I increased each new layer for a bit more than the previous one, where the last layer is the top layer and it is the widest one. You are seeing my dimensions here, but you can come up with your own depending on how much tulle you have available. To expand the measurements here, it would mean adding the fullness, and if you are going for real fluffy, pumped up look, this is the place to take care of that. So go crazy have fun with it, but have in mind that with the full length skirt, adding fullness can also get pricey for having to buy more tulle. One thing to mention, the last layer I split in two parts, the top part, and the bottom part which you should once again increase in measurement than the previous one, and make the incremental here the biggest yet. The bottom part of the third layer I increased even more than the top part of the same layer.
To cut the first piece of fabric, and let us start from the first layer – the base, let’s take that calculated measurement for the waist plus add a little extra for the seam allowance – about 5/8″ – and that will be our width. So in my case, I am marking a little over 200 cm and cutting. I`m sorry I`m talking a bit in meters than in inches, but that`s just how my brain works after hopping the continents. Bare with me, I`ll convert everything for you, so no confusion (pls see video).
AFTER that first cut, mark the length that you are going for BUT, must not forget the seam allowance. So for the top part of the skirt you will need to add to your length about 5/8″ (that`s sort of a standard), but for the bottom, you need to decide what kind of a finish you want. You can still just fold under 5/8″ again – that`s one way to go, or you can make it a bit more professionally finished and go for 5/8″ for one fold PLUS do another fold of over an inch, which is what I did. Or, as a third option; if you are working with the fabric that doesn`t fray, like for example some stretchy knits, you may go without any fold nor seam on the bottom. Do your desired calculation and cut the length.
Next up is the tulle cutting. Again, go back to your waist calculations for the rest of the layers, start measuring one by one and start cutting. The length of the tulle, we`ll cut later. Tulle can be really hard to maneuver, especially if you are doing the full length as I am doing here, so I found it easier to do it on the floor. Just clean your floors good before you start, and if you have straight edge carpet, it can be an awesome guide for straight cutting. Go slow, have patience and don`t forget to mark each cut layer, because in the pile of tulle, you will not know which is which.
As for the last, third layer of the tulle, the outer one that supposed to come in two parts, I did cut it in two parts by; measuring 2/3 of the finished length of the skirt for the length of the top part, but leaving the length for the bottom part to be measured and cut later. Just keep on watching…
Transferring to the sewing machine now. When doing folds, pressing always helps, and I`ll start with the bottom edge of the base fabric, so I`m folding and pressing 5/8″, sewing it in place. Back again to the ironing board and folding in again 1 1/4″. Pinning all, and taking it to my sewing machine to be topstitched.
Next, I will do that one side seam that will create sort of a tube of our base fabric. I almost always use, so called French seam to finish my seams, it just looks so neat and tidy inside and out, but, you don`t have to. However, if your fabric does fray, you do need to finish your seam somehow. And just press it after you`re done sewing.
Now you have finished base in a desired length plus the seam allowance for the top of the skirt, and now is the good time to align your first and second tulle layers to this base and trim the length to match exactly. We are not going to be folding the tulle on the bottom and this is why I thought that in this step it is easier and safer to cut the length of the tulle following the finished base with the seam allowance on top (which we also need for the tulle as well). Just lay your base straight, place the tulle on top aligning one side to the top of the skirt and cutting extra following the bottom edge of the base. Take your time, do this slowly, not working on the third layer of tulle that comes in two parts – we`ll tackle that later.
Next up – with your sewing machine, sew that one side seam on the two layers of the tulle and make those really big tulle tubes, just like we did for the base. I did French seam again, it just looks nicer, but you don`t have to, tulle doesn`t fray, simple seam is OK, just make sure to turn it to the inside when building the skirt later on.
Up to now, we have finished the base tube and two full tulle tubes and it is time to connect them together.
Take all the tubes, base and tulle, and on its top, where the waist is going to be, mark four equal spots, first is obvious – the seam, then decide the rest by folding tubes in half. Place pins and be sure to jam them better in tulle fabric because they can fall out easily. Hopefully this illustration will help you better understand. Take the tulle tubes to your sewing machine, and with different color thread, baste along the top edge of the tube. Make sure to NOT lock the thread when basting and to definitely make a stop and a new start at each marking point.
Now use those not-locked, loose threads to gather more and distribute tulle equally, while matching the four markings of the tulle to four markings of the base. So, sort of put on, or dress on the first tulle layer over the right side of the base, which means wrong side of the tulle (where the seam is) is facing the right side of the base. Match and join together four markings on both base and tulle, and keep adjusting the tulle pulling or releasing the basting, and keep pinning the two fabrics together. Take it to the sewing machine and sew it in place, this time, locking the thread as you would normally. Repeat the entire process with the second tulle tube.
Before we continue, let`s take a few seconds break, I wanted to tell you how I came up with an idea to make this skirt, or THESE SKIRTS. Well, I didn`t – my sister did! We live apart, unfortunately, and every time I go to Europe to see my family and friends, we`d always have the best time, and not long ago we attended the wedding of our dear friend. So for that wedding, my sister asked me to make her a tulle skirt, black, short. And she knows that I miss her all so much, and that I`d do anything for her, so she is always using me to do sh..t for her every time I go there, cuz she knows I won`t say no. She`s been pain in my butt all my life. No you were no!. So I got on it, figured it all out and made it, and it was a show stopper at the wedding and other events after. People started asking her where she bought it and how to make it. I also fell in love with it, but imagined that the full length would be even prettier, so I decided to make one for myself and record the process for all of you. And you know what`s gonna happen now – my sister will flip out once she sees this one, and will most likely beg me to make her one too. Well, I can tell you one thing sis – here is the tutorial so you can make it yourself! I love you.
Continuing with the make of the skirt now…
The third layer of tulle is to be addressed next. Take its top part first, and insert its bottom edge in bias tape and sew in place all around. So if you remember, we didn`t cut the length of the bottom part of the third tulle layer because now is a good time to do it and be more precise. Take your so far finished skirt, which is the base with the two tulle layers sewn in and slip it on an ironing board – I found this to be easiest to maneuver with. Then, place the top part of the third tulle layer which now has the bias tape sewn on, by aligning it to the top edge of the skirt and laying it flat. Now you can easily measure the length of the missing, bottom part, taking in the entire size of the bias tape as well, because this is where we will make the connection – the bottom part seam will go under the bias tape of the top part and that way be invisibly added.
Again I found my geometrical carpet very helpful to mark and cut along, the measured length for the last, bottom part of the tulle. Now, we are going to do exactly what we did with the previous tubes, mark both parts in four, except this time, we are doing it first for the bottom edge of the top part where the bias tape is, and the top edge of the bottom part. We are going to connect these together first. Baste the top edge of the bottom part, but try using the same thread color to make it look invisible actually so you don`t need to worry about removing basting thread after cuz that would be a pain to remove out of the tulle, and on this joint spot, any other color thread might actually be visible. Once you`ve done that, match four marking of that edge to the four markings along the bias tape of the top part, by sliding it UNDER the bias tape, so that it is sewn in as in the wrong side of the last third tulle layer that we will get now.
Have patience, adjust basting and pin in place. On the sewing machine, topstitch the two parts together, following the existing stitch line on the bias tape. And there, the third tulle tube is now done and can be put on the rest of the skirt. Do everything as we did before with each layer when we were joining them together. Once you sew it all together in place, sew it one more time, just to re-enforce it.
Take the skirt that you made so far, which is the base and all three layers, by folding its top edge make again four markings. On your sewing machine, choose settings for very loose and long thread which you will use for basting now, considering that bunch of layers you need to go through are pretty thick now and you want to be able to easily gather it all on a basting thread. Also choose visibly different color for the basting. Baste in four takes like we did before.
We need now the fabric for the waist line to attach to the skirt and to run the elastic through.
For the width, you will take your HIP measurement and add seam allowance on each side. For the length, measure your elastic, multiply it by 2 and also add seam allowance on top and bottom. Measure, mark, cut TWO pieces of this fabric, which will be the fabric you used for the base of the skirt. With the wrong sides together, sew in both side seams, open them flat and press. On your new little tube for the waistline, fold in seam allowance on one edge and press. The opposite edge, the one that it`s not folded, mark in four again and dress it over the skirt, matching right sides together, and making connections at four markings first. Then by pulling the basting thread on the skirt, gather the top edge of the skirt and adjust to look even and pin to the edge of the waistline fabric. Take time to do this. Take it all to the sewing machine, don`t forget to take back your settings, and sew this in place. Go slow. Then do it one more time and trim any excess fabric and thread.
We are almost there!
Fold the waistline fabric to the inside and match the fold line to where you see the stitches on the skirt. Pin all around making sure all closes in perfectly and then slip stitch the fold to the skirt by hand, leaving the opening to thread the elastic in. Do not start doing slip stitch before you really pin it all around, because after few steps your stitch may start to skew a bit and your waistline might ended up looking distorted on one side. Just pin it first and no worries.
What is left to do is to measure the elastic to what feels comfortable on your waist, leaving a little extra for stitching. Pass it through the waistline, which may not go as smooth like in my case because I didn`t leave any wiggle room in the waistline casing, on purpose, I wanted to minimize the amount of creased fabric in the final look and also to not allow the elastic to twist inside while putting it on and taking it off. So take your time, keep passing the elastic in little by little and adjusting it at the same time. Once all is in, take both end of the elastic, make sure it`s not twisted anywhere inside and sew it together.
Adjust it back inside the casing and lastly, slip stitch the opening we used to thread the elastic in. Your skirt is done! Looking fabulous and timeless – I think it will always be in fashion.
OMGosh you guys! How accomplished do you feel?! Like a Super Master Genius? Just wait until someone asks you where you got it!
And as promised, let me give you some styling ideas on how to wear this skirt in different ways.
As you saw this outfit at the beginning of the episode, definitely my fave, will go well for some formal events, but not quite, let`s say ” business attire” formal. Imagine it to wear it at some art event for example, or a fashion show, which is exactly where I went dressed like this! I love the complete opposites clashing; so soft and feminine vibes of the tulle and a statement necklace on one side, and then the sharpness of the Moto jacket and the booties, sharpened even more by men fashion flare coming from the tie and a formal shirt on the other side. I also find this incredibly sexy; some people find it in buttoning down, while I think it`s in buttoning up actually!
The next two outfits are kinda casual, and I totally see them suitable for some girls’ only gatherings, nights out and talks over drinks, or weekend brunches.
And again I went for opposites in choosing casual tops. In this one I wanted to show you how thick knitted sweater, slightly draping over the skirt can look so great together with something as delicate as tulle. Balance it off with sturdier boots, but pretty enough to compliment the skirt. And balance the skirt with a piece of jewellery, showcasing here one of my designs.
For the other casual outfit I thought why not try mixing some plaid with the tulle, so I put on this lovely shirt, although jeans shirt would go well also! I followed the style with some cowboy-ish looking boots but toned down in color. And once again, I completed it all with one of the Sgravalli necklaces from my online shop.
And for the ending of this video, something dressier, something perhaps you would wear to a cocktail party or so. I styled this one to compliment the skirt, I sort of played along, and continued pairing it with the other delicate pieces, like this lovely see-through velvet body top, which makes the perfect background to super feminine, another one of mine hand knitted masterpieces of jewellery. No boots here, picked lovely, open sandals in nude shade to add to all the delicacy.
There you go folks, hope you got inspired, informed and ready to make your own fashion.
Don`t forget to sign up to my channel here, and also, head over to my blog at sgravalli.com and sign up there as well, so You`ll always be notified when I launch something new.
All additional info and all the links, including the link to my jewellery online shop is just right down below this video. You have something to add, share, ask, just put it all down in the comment box. I`ll get you next time, bye!